If your core workouts are all about bending with crunches and holding it right there with planks, it’s time to add the Russian twist to your routine.
“In life, we use many movements that include all planes of motion, one of which is rotation,” says Cody Braun, C.S.C.S. He explains that rotation is one of the most undertrained movement patterns of the human body. And when you skip it, you open yourself up to huge strength and functional deficits.
Whether you’re changing directions on the soccer field or reaching behind you into the backseat of your car, you need a strong, stable core that’s able to brace itself and protect your spine while rotating from side to side, Braun says.
Plus, if you want a core that looks chiseled from every angle, you need to get with oblique twist exercises — like the Russian twist.
A Word of Caution Before Performing the Russian Twist
When performing any exercise, form is of paramount importance. But with the Russian twist, as soon as your form slips, you will feel it — most likely in your low back.
To properly work your core muscles and avoid dumping stress into your low back, it’s important to focus on maximally squeezing your core — like you’re about to be punched in the gut — throughout the entire exercise. This will keep your torso rigid and in proper alignment.
If at any point during Russian twists you feel the arch in your low back exaggerate, try a variation of the move (see below) or cut your set right there and rest before starting up again.
Russian Twist: Step-by-Step Instructions
Program: Rough Around the Edges
Workout: Total Body Killer Core
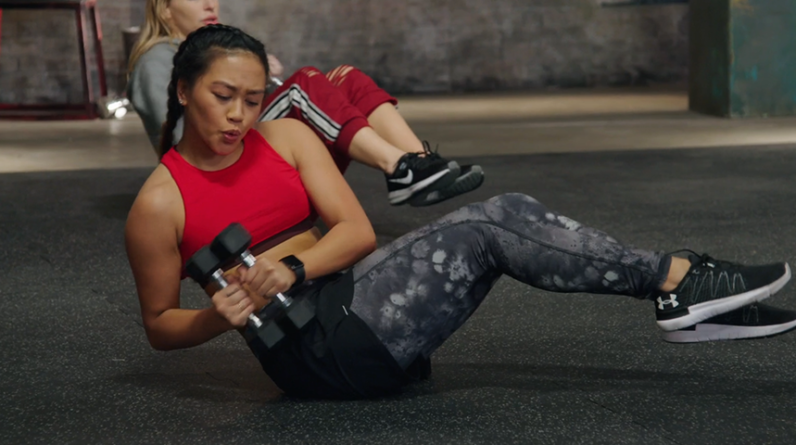
- Sit on the floor, holding a pair of dumbbells in front of your chest, and balance on your butt with your knees bent and feet together a few inches off the floor.
- Keeping your back flat and core braced, rotate your torso to your right and lower the weights toward the floor outside your right hip.
- Return to the starting position, and repeat to your left. Continue alternating sides, performing equal reps on each.
Russian Twist: Muscles Worked
- Obliques: Including both the deep-lying internal obliques and more superficial external obliques, these muscles sit along the sides of your torso and are the primary drivers of both rotation and lateral flexion.
- Transverse abdominis: Called the TVA for short, the transverse abdominis is in charge of stabilizing your spine, acting like an internal corset that keeps everything nice and tight.
- Rectus abdominis: These crave-able six-pack muscles work to flex the lumbar spine and help keep the torso lifted — crunch-style — throughout the exercise.
How to Make the Russian Twist Easier
If Russian twists are too difficult for you or are uncomfortable for your back, try performing them using just your body weight and/or with your feet on the floor.
“When you place your feet on the ground, you increase stability through points of contact,” Braun says. This reduces the amount of work the core has do to keep you supported and can help ease stress on your low back.
Alternatives to the Russian Twist
Also, whether or not you perform Russian twists, there are plenty of other rotational core exercises you can add to your routine that place minimal stress on your back. Try out these core moves and stick with the ones that feel good for you.
1. Bicycle crunch
- Lie on your back with your legs out straight, and interlace your fingers behind your head, gently resting your head on your fingers. Keep your elbows pointed out to the sides and try to relax your neck.
- Press your lower back to the ground, engage your core to lift your shoulder blades off the ground, and bring your right knee in toward your chest as you rotate your torso to bring your left elbow toward your right knee. Keep your left leg straight.
- Reverse the motion by straightening your right leg as you bend your left leg and bring it in toward your chest as you rotate your torso to bring your right elbow toward your left knee.
- Continue for reps, and once you’ve conquered the proper form, switch legs and rotate faster to introduce a cardio element. Your lower back should stay on the floor for the whole movement.
2. Standing band rotation
- Secure a resistance band to a sturdy object at navel height.
- Stand next to the anchor point with your feet hip-width apart, knees slightly bent.
- Hold the handle with both hands, arms fully extended in front of your chest and torso rotated to face the station.
- Brace your core and rotate your torso so that you face away from the station, arms still extended in front of your chest.
- Pause, then slowly reverse the movement to return to start.
3. Low-to-high dumbbell chop
- Grab a dumbbell with both hands (one hand on each end), and lower into a quarter-squat position.
- Hold the dumbbell to the outside of your right knee, your arms fully extended and diagonal from your body. Your torso should face the weight.
- Keeping your arms fully extended and torso facing the weight, squeeze your abs, pivot to the left and release the right heel as rotate your hips to pull the dumbbell up and across your body until it’s above your left shoulder.
- Pause, then slowly reverse the motion to return to start. Repeat on the opposite side.
4. Plank cross tap
- Start in a high plank with your arms straight, hands in line with (but slightly wider than) your shoulders, feet together, and body straight from head to heels.
- Keeping your back flat, lift your right foot and bring your right knee to your left elbow.
- Return to the starting position. Do equal reps on both sides.


